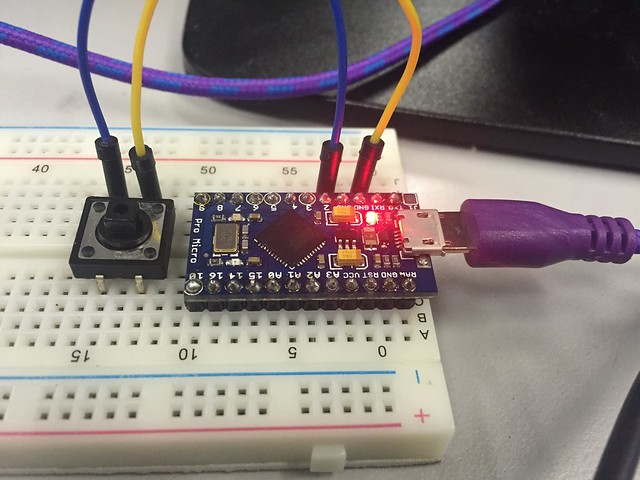
I bought this little thing – Micro Pro – from the China website. I think it is a clone or compatible to the SparkFun’s Micro Pro. It is easy to use. It comes with USB that you can use it to program the microcontroller or let the microcontroller to communicate with your computer. You can simply use the Keyboard library from the Arduino to program a keyboard emulator: http://www.arduino.cc/en/Reference/KeyboardPrintln.
Below is the specification of the microcontroller:
- ATmega32U4 running at 5V/16MHz
- Supported under Arduino IDE v1.0.1
- On-Board micro-USB connector for programming
- 4 x 10-bit ADC pins
- 12 x Digital I/Os (5 are PWM capable)
- Rx and Tx Hardware Serial Connections
Below is the source code for my program that emulates a card reader keyboard:
int button = 2;

void setup() {
  pinMode(button, INPUT_PULLUP); // Use internal pull up resistor
  Keyboard.begin();
}

void loop() {
  int pressed = digitalRead(button) == 0;
  if (pressed) delay(500);
  if (pressed && digitalRead(button) == 0) {
    Keyboard.println("111111");
    delay(2000);
  } else if (pressed) {
    Keyboard.println("222222");
    delay(2000);
  }
}
If you press the button once quickly, the microcontroller will send the card data string “111111” (with new line) to your PC via USB HID keyboard driver.
If you press the button once a little bit longer (around 500 milliseconds), the microcontroller will send the card data string “222222” (with new line) to your PC via USB HID keyboard driver.
I’m using a internal pull up resistor in the microcontroller itself so that I do not need to have a external resistor to pull up or down the floating digital pin (when used as input). When the input pin is pull down (when the switch is pressed) to the ground, the digitalRead will return zero value and otherwise it will be value one.
It’s so simple that you can make your program ready within minutes. Of course, you must first make sure the programming environment (IDE, the COM port of the Micro Pro is properly installed) is ready.


Leave a Reply